
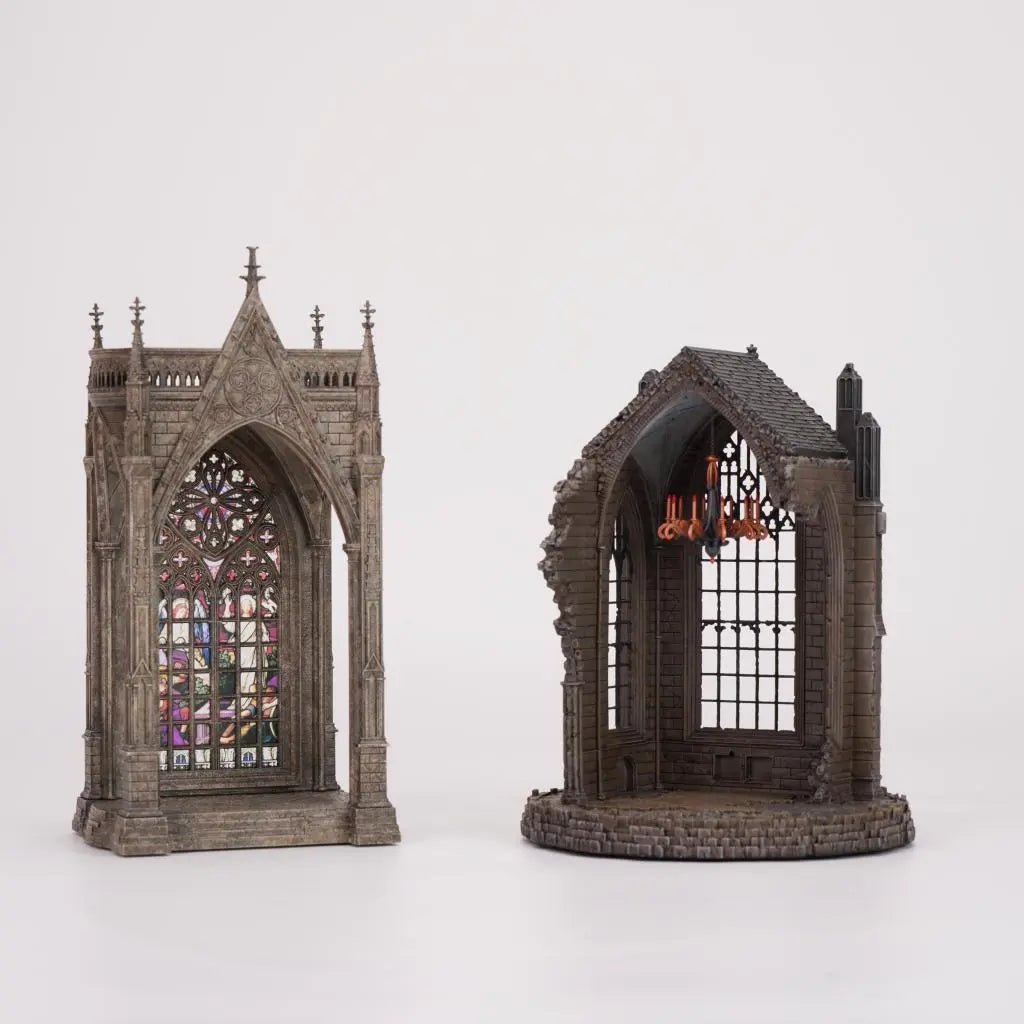
Gothic Miniature Night Lights: Ruin vs. Revelation
Halloween has two kinds of fear, and only one of them is worth building a room around. The first is the jump scare — the mask, the sudden noise, the thing behind the door. It works for about four seconds. The second is older and quieter: standing in front of something far larger and far older than you, and finding it beautiful rather than threatening. Edmund Burke spent a whole treatise on that feeling in 1757 and called it the sublime. Horace Walpole turned it into a genre in 1764 with The Castle of Otranto, and gothic storytelling has been borrowing from him ever since. Both of the miniature night lights below belong to that second kind of fear. They also happen to split gothic into its two permanent directions — because every ruined building in the world is answering one of two questions. Did time take it, or did time leave it alone? The Ruins — one bay of a gothic abbey, lit from inside. 19 cm tall, 1:12 scale. Halloween is one night. Gothic is a season. The holiday most people celebrate on October 31 is the opening of a three-day sequence, not the end of one. Halloween itself grew out of Samhain, the Celtic threshold between harvest and winter; the church later folded it into Allhallowtide — All Hallows' Eve on 31 October, All Saints' Day on 1 November, All Souls' Day on 2 November. That structure is why these two pieces aren't seasonal. A carved pumpkin looks wrong on 3 November. A lit cathedral does not. The mood that Halloween borrows for 48 hours is the same mood that dark academia runs on all year — and it gets stronger in November, when the light goes early and every window in the house becomes more interesting than the television. Two ways to answer the same question Both pieces are gothic miniature night lights. They differ in what happened to the building. The Ruins: when time wins This is a fragment — one bay of a gothic abbey, standing 19 cm tall and 15.5 cm long, with the rest of the building simply gone. Stonework crumbles at the edges. A chandelier of candles hangs where the roof used to be. Nothing here is intact, and that's the point: the piece is about what's left after the argument is over. The light does the work. A warm LED behind the broken arch throws a flickering glow through the window tracery, so the shadows on your wall move slightly and land wrong. It's a small effect and it changes the object completely — the same piece under a ceiling light looks like a model, and at night it looks like somewhere you shouldn't be. Control is a touch sensor on the base. No switch to find in the dark, no app, no remote to lose. At 1:12 scale, 19 cm represents roughly 2.3 metres of real stone — the height of a side chapel, not a cathedral, which is exactly why it reads as a ruin rather than a church. In a book nook, seen from the side — the broken silhouette is the whole appeal. The Twilight Court: when time stops The second piece answers the same question the other way. This is a complete gothic structure, 23.6 cm tall — four piers, a pointed gable, pinnacles still sharp, and stained glass that has not fallen out. Nothing has been lost here. It's the building the abbey used to be, before whatever happened, happened. The Twilight Court — 23.6 cm of intact gothic, lit through the glass. Its light behaves differently too, and this is the distinction worth understanding before you choose. In the ruins, light leaks — it escapes through damage, in fragments, unevenly. In the Twilight Court, light passes through — the stained glass is intact, so the glow arrives coloured and deliberate, the way stained glass was always meant to work. The controls tell the same story. The abbey runs on a single touch sensor and a steady flicker, because a building without a roof doesn't hold its light properly. The cathedral has a touch control with three brightness levels — you can turn it down to almost nothing, or up until the colour reaches the wall opposite. One piece is lit by what's left of it. The other is lit on purpose. It runs on USB, so there's no charging cycle to remember — plug it into the same strip as your desk lamp and leave it. On a dark shelf it reads as a standing lamp; on a witchy altar or in a meditation corner it reads as something else entirely. Where each one actually belongs The Ruins wants a book nook or the end of a shelf where it can be seen from the side. The broken silhouette is the whole appeal, and it disappears if you look at it straight on. It's also the better choice for a Halloween display that you plan to leave up — it reads as "October" without reading as "costume." The Twilight Court wants height and a dark background. Put it above eye level on a bookshelf and the coloured glass does what stained glass is designed to do: throw colour onto the wall behind it. It's the one people notice from across a room, which makes it the better gift of the two. Both are cast in resin and finished by hand. Neither is a kit — they arrive assembled and wired. Light behaves differently in a bright room Neither piece is a reading light. The Ruins puts out enough to see by and not enough to work by; the Twilight Court is brighter through the glass, and directional. What changes the effect most isn't the lamp — it's the wall behind it. A white wall flattens both; a dark one doubles them. If your shelf sits against pale paint, put a dark board or a folded cloth behind the piece before you decide it's underwhelming. Why each one looks slightly different Resin holds fine detail better than wood or ceramic at this size — tracery, crockets, the individual flames on a chandelier — and it doesn't swell or warp with humidity. The stone texture is applied by hand afterwards, which is why the weathering settles differently on every cast. Your abbey's moss is not in exactly the same place as anyone else's, and that gap is what separates a moulded ornament from a small piece of scenery. Touch control, three brightness levels. No switch to find in the dark. Which one is yours Something that looks like it survived a fire The Ruins · $34.99 Something that looks like it was never touched Twilight Court · $49.99 A Halloween display you'll keep up through winter The Ruins A piece for an altar, a meditation corner, a dark bedroom Twilight Court A gift for someone who reads too much gothic fiction Either — the Ruins is the more specific object To spend under $40 The Ruins FAQ Do the lights come included? Yes. Both arrive wired and working, and both are operated by touch. The Ruins is a warm LED with a single flickering setting; the Twilight Court runs on USB with three brightness levels. How tall are they? The Ruins is 19 cm (7.48 in) high and 15.5 cm (6.1 in) long — 1:12 scale, which reads as about 2.3 metres of real stonework. The Twilight Court is 23.6 cm, taller than the abbey, which is why it reads as a complete building rather than a fragment. Is this a Halloween-only decoration? No, and that's deliberate. A pumpkin is seasonal; a lit gothic window isn't. Both pieces work year-round, and they suit November and December at least as well as October. Are they DIY kits? No. Both arrive finished and wired. They're cast in resin with hand-finished stone texture, so surfaces vary slightly piece to piece. Can I use them as actual night lights? Yes — that's how most people end up using them. The Ruins' warm LED is dim enough to sleep beside, and the Twilight Court throws colour rather than direct light. The point of a lit window A jack-o'-lantern is a face. A lit gothic window is an invitation — it suggests someone is inside, and it doesn't say who. That's the difference between the two kinds of fear we started with, and it's why these pieces stay on the shelf after the candy is gone. October asks you to be frightened for one night. November just asks you to be indoors, with the lights on. Which is the whole case for a gothic miniature night light: not a scare, a window. Both are in stock now. The Ruins ships from $34.99; the Twilight Court is $49.99. Shop the Gothic Ruins Shop the Twilight Court Building a full dark-academia shelf? They sit well beside the Cat Witch's House and our 1:64 Rococo Hall.
Miniature Gold Weathering Tutorial|Say Goodbye to the Plastic Look with an Aging Wash
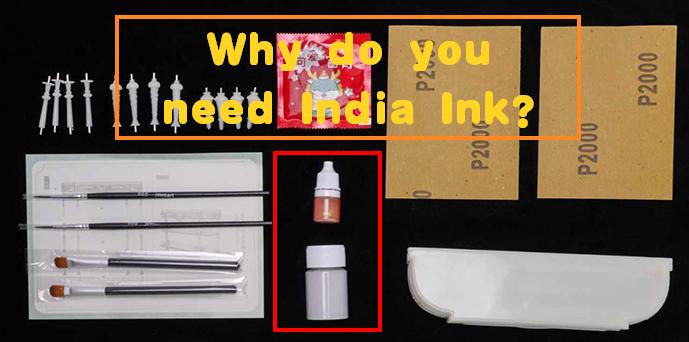
Miniature Gold Weathering Tutorial|Say Goodbye to the "Toy Look" with an Aging Wash Creator:Ryan Finished a gold miniature and it looks too shiny, too fake, too plastic? The problem isn't the gold leaf or gold paint itself — it's the lack of weathering. Real antique gold doesn't glow evenly; dust settles in the crevices, edges oxidize, and the whole piece carries a darkened, aged tone. One thin wash of aging liquid (wash) over the gold, then a light wipe of the surface color, instantly gives your 1:6 dollhouse furniture a cinematic, vintage metal texture. Why Does Gold Miniature Furniture So Easily Look Like a Toy? When people first get into dollhouses or food-toy scenes, they're drawn to shiny gold furniture: little chairs, side tables, carved mirror frames — spray on a coat of gold and it sparkles. But in photos it still reads as a toy. Three reasons: Too even in color: Real metal shifts light and dark through oxidation and friction, while sprayed/painted gold is "flat all over." No shadows: Carvings, seams, and grooves have no dark deposit, so the sense of depth is cut in half. No trace of time: The "glaring new-gold shine" and the warm patina of old gold feel completely different. This is what the miniature community calls the "plastic look." The key to fixing it is weathering / aging. What Is Gold Weathering? The Model World Calls It Wash / Pin Wash In miniature painting, dollhouse furniture, and BJD accessory circles, weathering usually goes by three names: Weathering: A general term for making a new item look used and aged. Wash: Applying a diluted dark liquid over the model surface, letting capillary action pull it into the recesses, then wiping off the surface color. Panel line wash: Emphasizes leaving the dark liquid in seams, carvings, and joints to form shadow lines. For gold miniature furniture, the most common method is the wash: use a black, dark-brown, or India Ink diluted liquid over the gold surface, then wipe the raised areas, leaving the dark only in the recesses. That single step turns "flat" into "three-dimensional." How to Make an Aging Wash? Three Common Recipes Compared Aging liquid Effect Beginner-friendly? Notes Black/brown acrylic + water Controllable color, but prone to water marks on flat areas Medium Needs practice on dilution ratio Dark enamel/oil paint + turpentine Good flow, easy to wipe after drying Medium Strong odor, needs ventilation India Ink diluted liquid Warm brown-black when diluted, extremely fluid, leaves shadow only in recesses Recommended Dilute heavily with water or alcohol; very thin, natural shadow Step-by-Step: Weathering Gold Furniture with an Aging Wash (with Material Kit) If you're using our 1:6 Scale Shelf Kit, the aging liquid, fine brush, wiping pad, and P2000 sandpaper are already included. Just follow these 4 steps: Step 1 — Finish the Gold Base First smooth the white model parts (lightly sweep the edges with the P2000 sandpaper from the kit), then spray or brush on gold primer / apply gold leaf. Wait for it to fully dry. The base color decides whether the final result is "bright gold" or "matte vintage gold." Step 2 — Thinly Apply the Aging Liquid Using the fine brush from the kit, pick up a small amount of aging liquid and brush it thinly and evenly across the entire gold surface. Keep the liquid diluted — better to apply two thin layers than one thick smear. Step 3 — Let the Liquid Seep into the Recesses Rest for 10–30 seconds and you'll see the dark liquid flow on its own into carvings, seams, and screw holes — the low points. This is the heart of the wash: capillary action paints the shadows for you. Step 4 — Gently Wipe Off the Surface Color With a clean pad or tissue, wipe the raised areas in one direction. After wiping, the dark stays only in the recesses while the gold flat recovers its shine but with a subtle darkened tone. If too light, repeat Steps 2–4; if too dark, dab a little thinner on a cotton swab to correct. Before & After: Why Weathered Looks More Real Compare the two test pieces: Left (un-weathered): The gold chair glows uniformly with no light-and-dark variation — instantly recognizable as "freshly factory-painted plastic gold." Right (weathered): The carved gold side table has deep-brown shadows settled in the recesses, while the raised surfaces keep their gold sheen, showing an overall warm, time-polished metal feel. This is the true role of the aging liquid: not to dirty the gold, but to give it layers, a story, and realism. Advanced Tips: Make the Weathering More Natural Layered buildup: First brown, then black, then a touch of rust color, to mimic different oxidation layers over time. Dry-brush highlights: With an almost-dry gold paint, lightly sweep the raised carving edges to create high-frequency wear highlights. Local sanding: Use P2000 sandpaper on frequently touched spots (chair legs, table edges) for slight exposed-base wear, mimicking real use. Consistent light for photos: After weathering, side lighting best reveals the recess shadows and makes product shots more textured. Frequently Asked Questions Q1: Will the aging liquid completely cover the gold? No. Done correctly ("thin apply + light wipe"), the liquid stays only in the recesses and the raised areas remain gold. If it covers, you applied too thickly or wiped too late. Q2: Can I weather with only a brush, no airbrush? Absolutely. A brushed gold primer works fine for washing once dry. Just keep the brush layers thin and even to avoid buildup that blocks the wash flow. Q3: Does this work for both 1:6 and 1:12 dollhouse furniture? Both. 1:6 furniture has larger carvings, so the liquid can sit a bit longer; 1:12 is finer, so dilute more and move faster to avoid over-darkening. Q4: What color is the aging liquid in the kit, and what style does it suit? Usually dark brown / black-brown, suited to vintage, French country, Victorian, and antique-shop styles. For a bright modern dollhouse, reduce the amount or skip weathering. Q5: Can I re-apply gold after weathering? Yes. If some raised areas got wiped too dark, dry-brush a little gold back on. Weathering is reversible and buildable — beginner-friendly. Q6: Can this technique be used on food toys or other mini ornaments? Yes. Any gold-surface miniature — mini photo frames, small candlesticks, food-toy tray borders, BJD accessories — can be wash-weathered for more realism. Closing Gold weathering isn't about making things dirty; it's about adding a layer of "time" to your miniature furniture. One bottle of aging liquid, one fine brush, a few wipes — and the plastic-looking gold paint becomes a warm antique gold. If you're still troubled by unrealistically shiny dollhouse furniture, start with this one bottle of aging liquid. Check out our 1:6 Scale Shelf Kit — gold base and aging liquid are pre-packed, ready to use right out of the box.

We Make Miniatures
Founded in 2021, our headquarters, design and production base are located in Tangxia Town, Dongguan City, Guangdong Province.
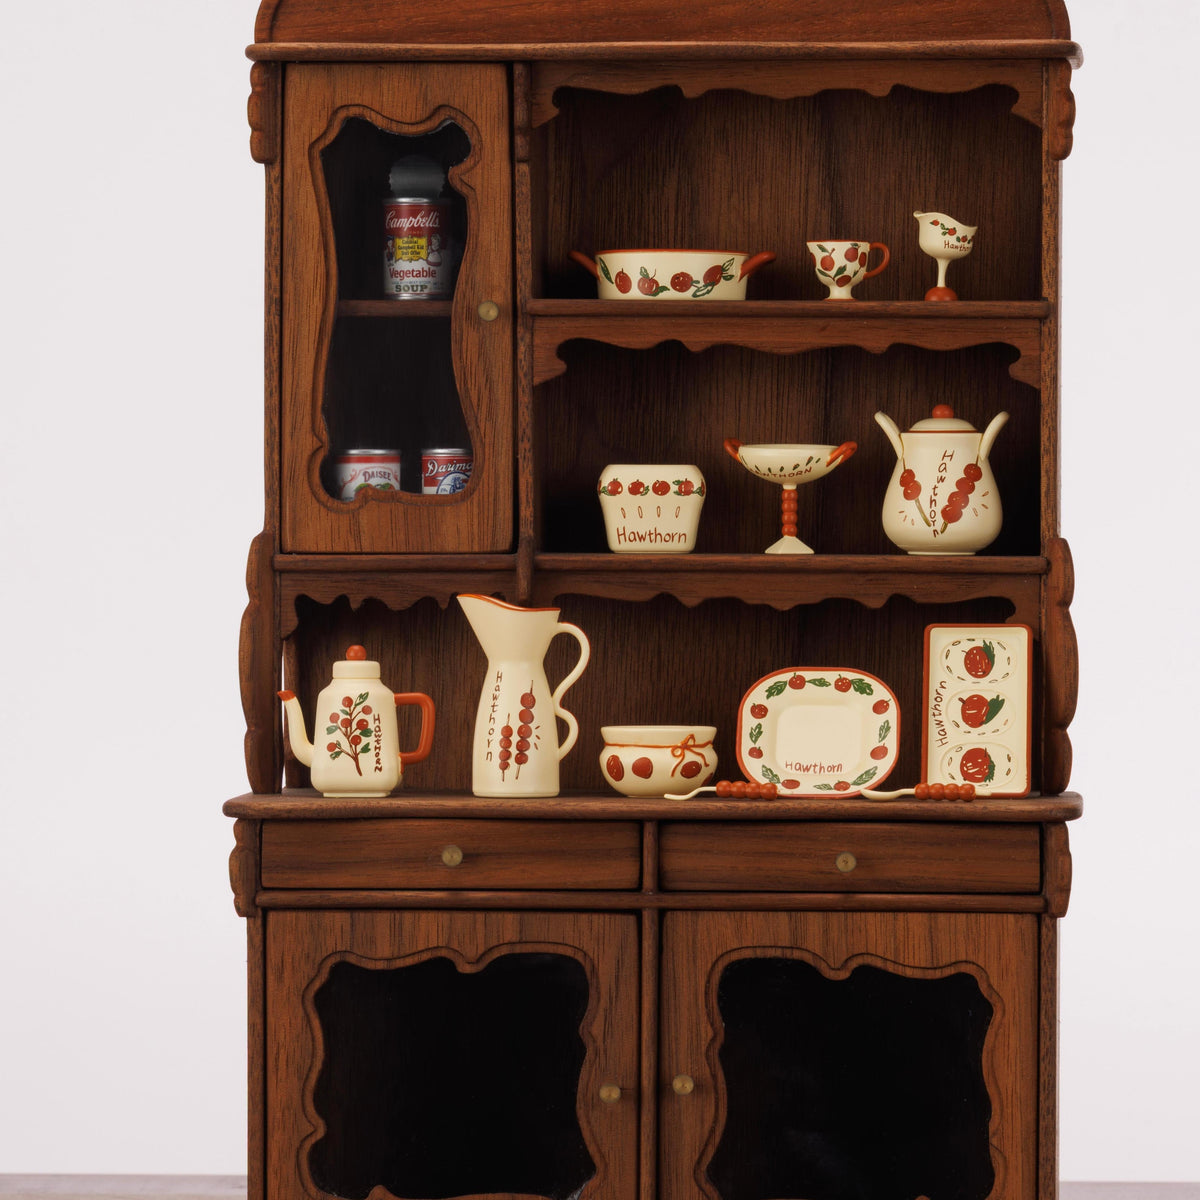
1:6 Hawthorn Tableware Miniature Ornament
Bring the sweet hawthorn feast of a whole table into the 1:6 miniature world.
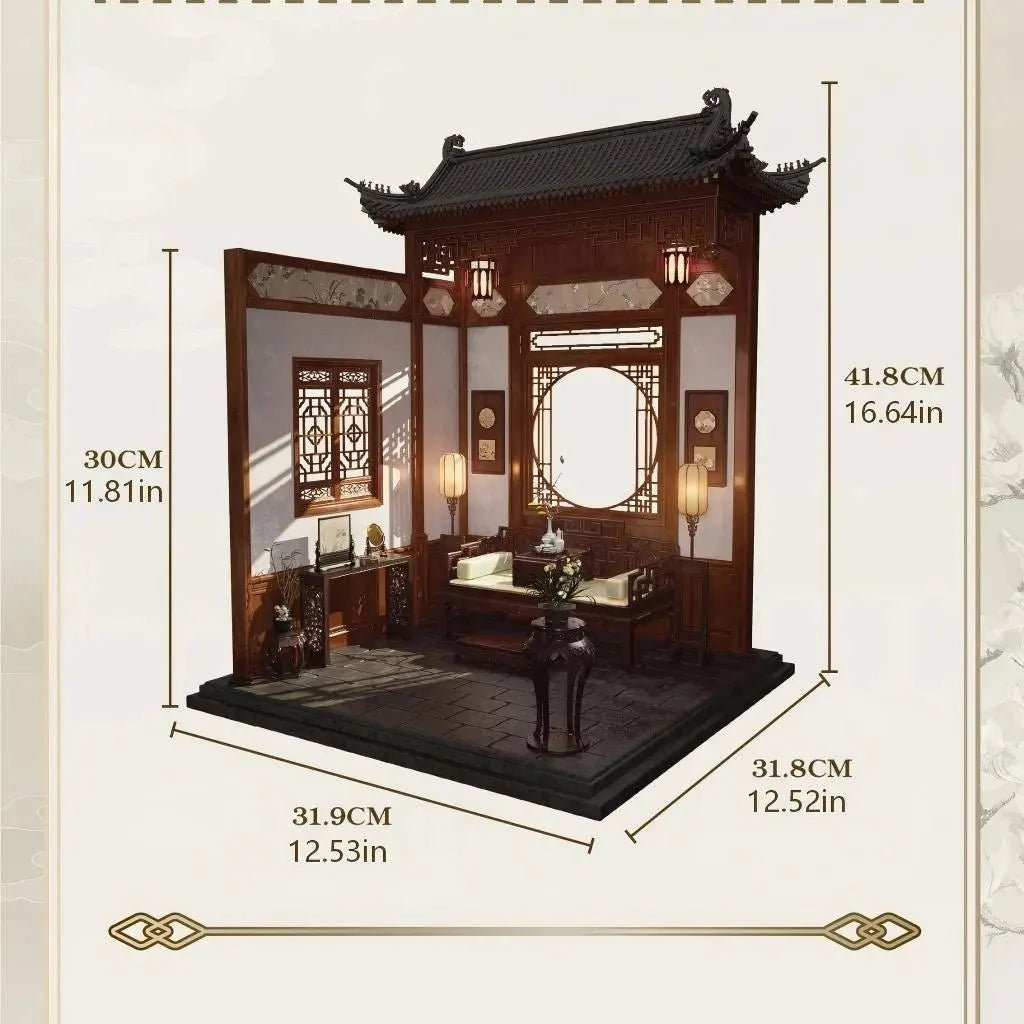
What is Chinese Ming‑style miniature?
A Chinese Ming-dynasty-style miniature is craft distilled: restraint over ornament, hardwood over paint, joinery over glue. At 1:12 scale it becomes a small, durable piece of design history you can hold and display. Whether you collect one hero chair or a full room, the Ming vocabulary rewards a slow, close look — exactly the kind of collecting Miniento is built for. Want the style in ready-to-display form? See our 1:12 Chinese-Style Dollhouse Bedroom.

Why Do Miniento DIY Kits Include Paint? The Design Philosophy Behind the Box
Most DIY miniature kits on the market exclude paint, creating extra shopping steps, material waste, and frustrating barriers for beginners. Miniento redefines the crafting experience with fully inclusive all-in-one kits that come with custom-matched non-toxic paint sets, professional brushes, and complete accessories. By covering precise color formulas, portioned paint volumes, and safe materials, Miniento eliminates prep work and guesswork, delivering true out-of-the-box convenience. Designed for effortless starts, zero waste, and personalized creation, these kits support both beginner-friendly simple painting and unique custom artwork. Beyond crafting fun, the complete kit setup helps users enjoy relaxing, stress-relieving creative flow. Ideal for personal hobbies and thoughtful ready-to-use gifts, Miniento prioritizes seamless user experience over lower production costs, making every project accessible, enjoyable, and one-of-a-kind.

Say Goodbye to Plastic: Reclaiming Realism with Solid Metal Miniatures
When designing and constructing your personalized dollhouse from scratch, choosing decorative furnishings and accessories is always the most vexing step. Plastic is the primary material for the vast majority of miniature ornaments on the market. Manufacturers mass-produce them with injection molding and apply decorative paint via mechanical spraying. However, the cold, flimsy texture of plastic always clashes sharply with the realistic dollhouses built with elaborate effort. What’s more troublesome is the inherent flaw of plastic decorations: after prolonged display under lighting exposure and air oxidation, they will soon turn yellow and dull, become brittle with aging, and their originally bright hues gradually fade and mottle. I am especially eager for miniature pieces crafted entirely from solid metal. Mini furniture, tableware and decorative ornaments forged from brass, and alloys feature delicate, and their substantial weight delivers a strong sense of quality. Metal resists oxidation caused by daily lighting exposure, so it rarely yellows or fades. It maintains its fine texture perfectly even after long-term display. Its crisp, intricate textures faithfully replicate real-life objects. When matched with a dollhouse, metal decorations help create an incredibly lifelike and authentic domestic atmosphere. Miniature Dollhouse Cutlery Set | Gold & Silver Plated Knives and Forks For High-End Dining Tables & Micro-Dining Photography Starting with the dining table essentials, this micro cutlery set elevates everyday meal settings into luxurious banquets. Micro-Scale Precision (2.9 cm / 1.14 in): Perfectly scaled for both 1/12 dollhouse dining rooms and 1/6 fashion dolls (Barbie, Blythe, BJD). High-Shine Mirror Finish: Electroplated in pure Gold and Silver, these pieces bounce light naturally, avoiding the flat, fake look of silver-sprayed plastic. Ornate Handle Scrollwork: European baroque floral motifs are deeply carved into the slim handles, creating dynamic light and shadow contrasts in close-up photography. 1:6 Scale Vintage Royal Tea Set | Gold & Silver Miniature Ornament An Aristocratic Grand Tea Party Experience If you are staging a grand living room, a palace tea cart, or an elegant coffee table scene, this multi-piece set by Miniento brings royal European tea culture to life. Complete Multi-Piece Collection: Includes a Teapot, Round Plate, Ornate Floral Tray, Square Handle Tray, Lid, and Micro Sugar Tongs. Intricate Lace Filigree: The Floral Tray features a micro-etched lace border with delicate cutout detailing, while theteapot boasts flowing rococo handles. Interactive Micro Realism: Tiny details like functional micro tongs add storytelling charm to stop-motion videos and display staging. 3-Piece Vintage Antique Silver Tea Set Aged Heirloom Quality with Victorian Relief Carvings For collectors who prefer a richer, aged vintage aesthetic over high-gloss shine, this 3-piece antique silver set brings classic Victorian elegance to 1/12 scale scenes. Antique Silver Patina: Finished with an aged, oxidized dark-silver patina that settles into the deep grooves of the carving, creating dramatic depth and heirloom character. Proportional Dimensions: Kettle: H: 1.96 in (4.98 cm) | L: 1.18 in (3.0 cm) Creamer: H: 1.37 in (3.48 cm) | L: 1.18 in (3.0 cm) Cup: H: 0.78 in (1.98 cm) | L: 1.18 in (3.0 cm) Full-Body Victorian Floral Scrollwork: Every curve—from the spout to the footed bases—is wrapped in deeply embossed floral relief patterns. Conclusion: Invest in Timeless Metal Realism Don't let aging, yellowing plastic ruin the effort you put into building your dollhouse. Whether it's the high-shine brilliance of gold/silver plating or the historic charm of antique carved silver, choosing pure metal miniatures guarantees an authentic, heirloom-quality atmosphere that stays pristine forever.

Why Are There So Many Dollhouse Scales? A Slightly Obsessive History
Dollhouses come in different scales because they were never made for a single purpose. Early baby houses were custom adult display objects; later scales developed around collectors, children’s toys, fashion dolls, model railways and limited display space. Each ratio offers a different balance of detail, interaction, architecture and size.

Best gift for miniature enthusiasts
Best give for miniature enthusiasts: Exquisite details, authentic reproductions, crafted purely for your passion.

The girl who once dreamed of palaces later became my mother
New Gift Option for dollhouse lovers - Mom.

Free Shipping On All Orders Over $99.99 | Miniento
Whether you are looking to complete your Frère Series collection or starting a new 1/6 scale project, we want to make it easier and more affordable for you to get the high-quality miniatures you love, delivered straight to your doorstep.

Making a miniature Rococo Hall
As a seasoned miniature craftsman with years of experience, I would like to briefly share the core production process of the Rococo hall model based on my practical operations, with meticulous attention to details and professional control throughout.

Ancient Elegance at Your Fingertips: Building Your Own 1:12 "Study of Ancient Insights"
In our fast-paced modern world, we all seek a "spiritual sanctuary"—a quiet corner where the soul can rest Today, I’m taking you into a world of micro-wonders: the 1:12 Scale Chinese Ancient Style Miniature Diorama—"The Study of Ancient Insights" (知古小斋). This is more than just a display piece; it is a deep dialogue between Eastern aesthetics and the art of hand-crafting. ⛩️ The Inspiration: A Scholar’s Escape The "Study of Ancient Insights" is rooted in the literati culture of the Ming and Qing Dynasties. In ancient China, a study was not just a place for ink and books; it was a private sanctuary for scholars to cultivate their character and "escape" into nature and history. The design features classic Suzhou-style architectural elements. The grey-tiled flying eaves and intricate lattice windows are not just boundaries of space—they are masters of light and shadow. When sunlight filters through the "Wan-zi" (swastika) patterns and casts shadows on the stone floor, the atmosphere of ancient serenity is instantly captured. 🎨 Craftsmanship: Reviving Timeless Chinese Elements The magic of this piece lies in its extreme dedication to authentic Chinese cultural symbols: The Backbone of Ming-style Furniture: The centerpiece desk and chair recreate the "simple yet profound" lines of Ming furniture. The iconic Horseshoe Chair (Quanyi) features a rounded back that perfectly illustrates the Chinese philosophical concept of "Tian Yuan Di Fang"—the Round Heaven and the Square Earth. The Elegance of Scholar's Objects: Tiny hand-painted scrolls and delicate porcelain vases sit upon the desk, making it feel as if the master of the house has just stepped out for a moment, leaving the scent of ink behind. Landscape Imagery: The landscape scroll on the back wall echoes the view through the open windows, achieving the poetic ideal of "life inside, scenery outside." 🛠️ 100% DIY: Become Your Own "Miniature Architect"Unlike many mass-produced, pre-built models, every component of the "Study of Ancient Insights" is designed for DIY assembly. This means you are not just the owner of this study—you are its Chief Architect. Since these artifacts are separate, movable pieces, you have the freedom to curate the room according to your mood. Place a jade carving on the desk today, or let the bonsai take center stage tomorrow—this sense of "curation" is where the true joy of DIY lies. 🏮 Final Thoughts: Finding Peace in the Details The "Study of Ancient Insights" is a bridge across time. Once you have placed the final jade carving and lit the miniature lanterns, you will find that an entire world of Chinese culture is contained within these few square inches. DIY vido

Do you like mixed-and-matched styles? The Dark Holy and a Lovely Little Bear
See Meets a Lovely Little Bear Beneath a sky veiled in perpetual twilight, the Dark Holy See loomed—its spires sharp as shards of shadow, its halls echoing with the hush of ancient, unspoken rites. Stone corridors smelled of damp earth and incense long faded, and every statue seemed to watch with eyes hollowed by centuries. Yet on this day, an odd warmth threaded through the cold stillness, soft and unshakable. Deep within a dark ruined church, its stained glass shattered, its pews splintered, and its altar draped in dust, something entirely unexpected had made itself at home. A huge, adorably round little bear had taken over this place. Its fur was thick and honey-brown, tufted at the ears and dusted with tiny specks of plaster from the crumbling walls. It padded slowly across the cracked floorboards, pausing now and then to nudge a fallen brick with its curious snout, or to tilt its head at the faint chirp of a bird nesting in the rafters. Where once there had been only solemnity and shadow, there was now a quiet, clumsy charm. The bear settled near the broken altar, curling its massive paws beneath its chest as if guarding some gentle secret. Sunlight filtered weakly through the broken windows, gilding the edges of its fur and turning the dust motes into tiny, floating stars. It was a lovely beginning to the story—one where the weight of the dark Holy See met the soft, unassuming light of a lovely little bear, and where even the loneliest ruins could find a new kind of peace.

How to Light Up Your Dollhouse-New products launched-night light
Mini fairy lights built for dollhouses—turn on, instant charm.

Fleur Garden Series: Reimagining 18th-Century European Court Aesthetics in Miniature
Fleur Garden Series: Reimagining 18th-Century European Court Aesthetics in Miniature

DIY Kits vs. Finished Miniature Furniture: Our Journey & Setbacks
Our Roots: From Finished Collectibles to DIY Exploration Over the past two years, we have rolled out a series of DIY products. Due to shipping costs, we ultimately chose to test them only in the US market. We are very grateful to our customers, as our products have received quite positive feedback. We tried selling them on Amazon, Temu, and our official website, and they essentially sold out. This prompted us to decide this year to upgrade and transform this DIY product line. For the first time, we attempted to make our DIY series products using steel molds. This attempt took significantly more time than we anticipated, and we invested over $50,000. However, the products still haven't materialized to this day. It has to be said that this is a significant setback. We are questioning whether mass-producing the DIY series is the right choice. We, Miniento, initially entered this market by making dollhouses and finished miniature furniture. We saw many customers struggling because they lacked sufficiently exquisite miniature scenes and props to decorate their dolls, so we chose the niche of high-precision miniature scenes and furniture. Initially, we sold finished products, not the DIY series. As the market gradually shrank, the price of our finished goods became relatively high – because finished products require a lot of manual labor. We are not a sweatshop; we fully respect the work and contributions of our team members. Starting last year, we attempted sales in the US but hesitated to sell finished furniture due to concerns about shipping damage. Nevertheless, many customers contacted us through Facebook and purchased some finished furniture. To these customers, we once again express our gratitude for their trust. After all, given the relatively high value of the goods, they were willing to place their faith in us unconditionally. Fortunately, these orders encountered no major issues during shipping, only some minor, unavoidable bumps. We also thank them for their tolerance and understanding – we promptly followed up and resolved any concerns. We have not given up on stocking finished furniture in the US market. Preparations are ongoing, and we are continuously designing new packaging.

Explore A New Way of DIY Miniature Furniture
A New Way of DIY Miniature Furniture